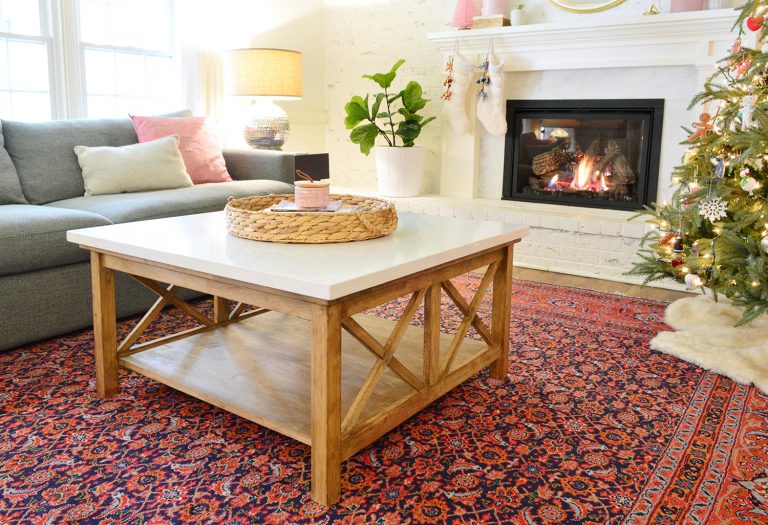
I’m someone who loves those detailed “what worked & what didn’t” posts where someone looks back on the choices they made and shares what didn’t work out as well as they hoped – and how they adjusted to make things work better for their family (more comfortable/more practical/more beautiful/etc). And since we furnished this house over two years ago – can you believe we did it in the fall of 2017?! – I thought it would be fun to share the changes we made since then in one big rundown post. So here we go. The Front Porch The Change: New front porch swing The Reason: The old one was already rotting! The original porch
Exterior Updates After Painting Our Brick House White
This is a smorgasbord of an update, since the exterior of our house has changed in a bunch of different ways since last year when we painted it white with masonry paint that lets the brick breathe (you can read all about that project & the cost right here). It’s my very favorite makeover we’ve ever done to date, but as I mentioned in that post (probably 10 times if I know myself), the exterior was still very much a work in progress after the house got painted. So without further ado, let’s talk about the new path we added, the awning, the new porch lights (we not only switched them out, we lowered them
Painting Our Brick House White!
The weather hasn’t been perfect for photos and our landscaping isn’t looking it’s finest at the moment, but I’M SO FREAKING EXCITED ABOUT OUR PAINTED BRICK HOUSE that I can’t wait any longer to share pictures! I am unable to even. And I’m a 36 year old suburban mom, so that’s saying something. Today we’re giving all the details about painting our brick house white: Our house is so heartbreakingly beautiful I literally would not be surprised if it started glimmering in the sun like Edward the vampire from Twilight. GO WITH ME HERE, THIS POST IS GONNA HAVE A LOT OF CAPS LOCK. You have been warned. And I’ll try to go easy on the
How To Hang Peel & Stick Wallpaper
Adding wallpaper to the middle bedroom at our beach house took us just a few hours and cost us less than $100. It’s a whole lotta bang for not much buck (or extra high skill level). Plus it’s 100% removable so if we ever tire of it or want to swap it for something else, it’s no big deal. Certainly less trouble than removing traditional wallpaper! So in this post we’ll show you exactly how we hung it, including a video I took of my lovely husband hanging a panel for you in real-time while I talk and point (you know, the things I’m most known for). Selecting Your Wallpaper There were two strategic choices
Our Bathroom Reno: The Floor Plan & Picking Tile
Ok, now we’re cooking with gas! Maybe I shouldn’t use that expression for a bathroom reno… ANYWAY… we’ve made lots of progress since partially demo-ing the room last week (more on that here), and wanted to share our final floorpan with you (IT’S SUCH A GIANT IMPROVEMENT!) and our final tile picks (along with a few other things we debated, why we chose what we chose, etc). So here’s the old bathroom layout. Yes we lived with it like this for over six years. Yes, it was A LOT of doors (the one leading from the hall to our bedroom is right behind where the tub is below – so there were five in a
4 Decorating Tricks For A Smoother Makeover
We’re in the midst of two room redos right now and I couldn’t be more excited about them! One is our bathroom reno that we shared last week, and the other is a much lighter and less dusty one, which involves zero demo or wall moving, but a whole lot of function that we’ll be gaining (plus a wall treatment + wallpaper, which thrills me to no end). We’re “reconfiguring” the middle bedroom at our beach house, which used to look like this. Yes, it’s a very small room that was basically all bed: Having a lighter room redo running in the background while we wait for orders like our bathroom tub & vanity to
Starting A Bathroom Renovation
If you listened to this week’s podcast you heard John and I proclaim that we’ve moved from the verrrrry long daydreaming and changing our minds phase of our bathroom planning process (which lasted over 6 years while we renovated most of the other rooms in our house as well as the entire beach house & duplex) into the finally-being-sure-of-what-we-want-to-get-out-of-it and beginning to actively space-plan it phase. For example, after years of going back and forth about whether we wanted a separate tub and shower or a tub/shower combo, we’re now 100% sold on separate ones (we have that setup at the beach house and it’s our favorite bathroom ever). I even said on this week’s
Updating Old Kitchen Cabinets With New Inset Doors
I’ve been so excited to show you Teresa and Andrew’s kitchen makeover. They’re some of our closest friends who live right around the corner from us, and ever since we filmed this bookcase styling time-lapse video in their living room, I’ve been not-so-patiently waiting for their new appliances to arrive so we could share a big ol’ virtual kitchen tour with you guys. Not only do they have amazing style, they also made SO MANY budget-friendly choices in this kitchen and I really hope they help to demonstrate that you can often work with a lot more than you might think (you don’t always have to scrap everything and start over!). And you can save
Our DIY “Stained Glass” Window
We had a totally different post planned for today, but then a super fun/random project fell into our laps on Monday night. We weren’t sure how things would turn out (we were kinda making up a DIY technique as we went along), but to say that we’re pleasantly surprised is a giant understatement. This might be my favorite under $10 project in the history of my life. And it could easily be repeated with any window you find at a thrift store, architectural salvage shop, or even at your local Habitat for Humanity ReStore. SAVE ALL THE GORGEOUS OLD WINDOWS, GUYS! Or you could just wander the streets hoping to be in the right place
Our Second Dollhouse Makeover
Since you guys have been asking how this large scale (but also, small scale – ha!) renovation has been going, I thought I’d share our second dollhouse progress. And if you missed our first tiny house makeover, you can check it out here. Yes, this dollhouse totally reminds all of us of our own house, which has been especially fun. And our nine-year-old daughter has been acting as the general contractor, the interior designer, and the architect, which has also been a blast. From helping with painting and art to choosing colors, arranging the furniture and brainstorming future project ideas – she has been at the helm… WHICH HAS BEEN SO ENJOYABLE FOR MY HOUSE-LOVING
Our Kids Room For Real Simple’s Idea House
Earlier this month we took the whole family (dog included!) up to Brooklyn for a few days to put together the space we’ve be designing for this year’s Real Simple Idea House over the past five or so months. I realize there’s a lot to unpack in that sentence (especially if you missed our podcast episode or Instagram stories about it) so we’ll catch you up right here and show you the *almost* finished space. And explain what’s still left to be done before their big photoshoot for the magazine and tell you about how some last-minute curveballs actually made the room better. And tell you what they do with everything in the house once
Before & Afters Of Our Beach House: Upstairs
Many moons ago John shared the beach house before & after photos from downstairs (tons of never before seen angles!) right here in this post. And it has taken us a while (how has it been eight months?!) to get the upstairs before & afters all together so you can see all of those comparisons, and browse the entire second floor of our project, which we are thrilled came together (it was looking ROUGH at the start). So let’s pop upstairs & look around, shall we? Because the transformations were just as big up there… UPSTAIRS HALL & OFFICE Here’s the upstairs hall as you face the front room that we converted into a mini
- « Previous Page
- 1
- …
- 5
- 6
- 7
- 8
- 9
- …
- 123
- Next Page »